Entering the “Hidden Treasure” Exhibition at the League of NH Craftsmen: My “hidden treasure” as a jeweler:
With a “call for entry” for an exhibition named “Hidden Treasure”, you can’t just send the piece of jewelry currently in process on your jeweler’s bench. Hidden in the recesses of your mind must be a pendant or pin with its own secret treasure, ready to reveal with one simple gesture.
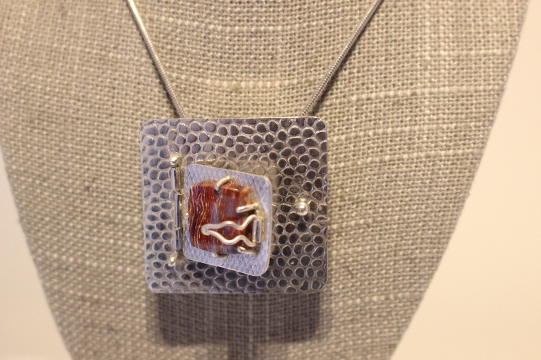
What did I have in my inventory? Silver sheet, silver tube, silver wire, a gorgeous hot-popping red colored Madeira faceted citrine, a semi-precious round stone only 4mm (only about ¼”) diameter, and a small striped polished Petrified Wood stone in coordinated red/brown colors. With these raw materials, about 20 hours later, I had created this finished piece, shown hanging in the League of NH Craftsmen’s exhibition in Concord, MA.
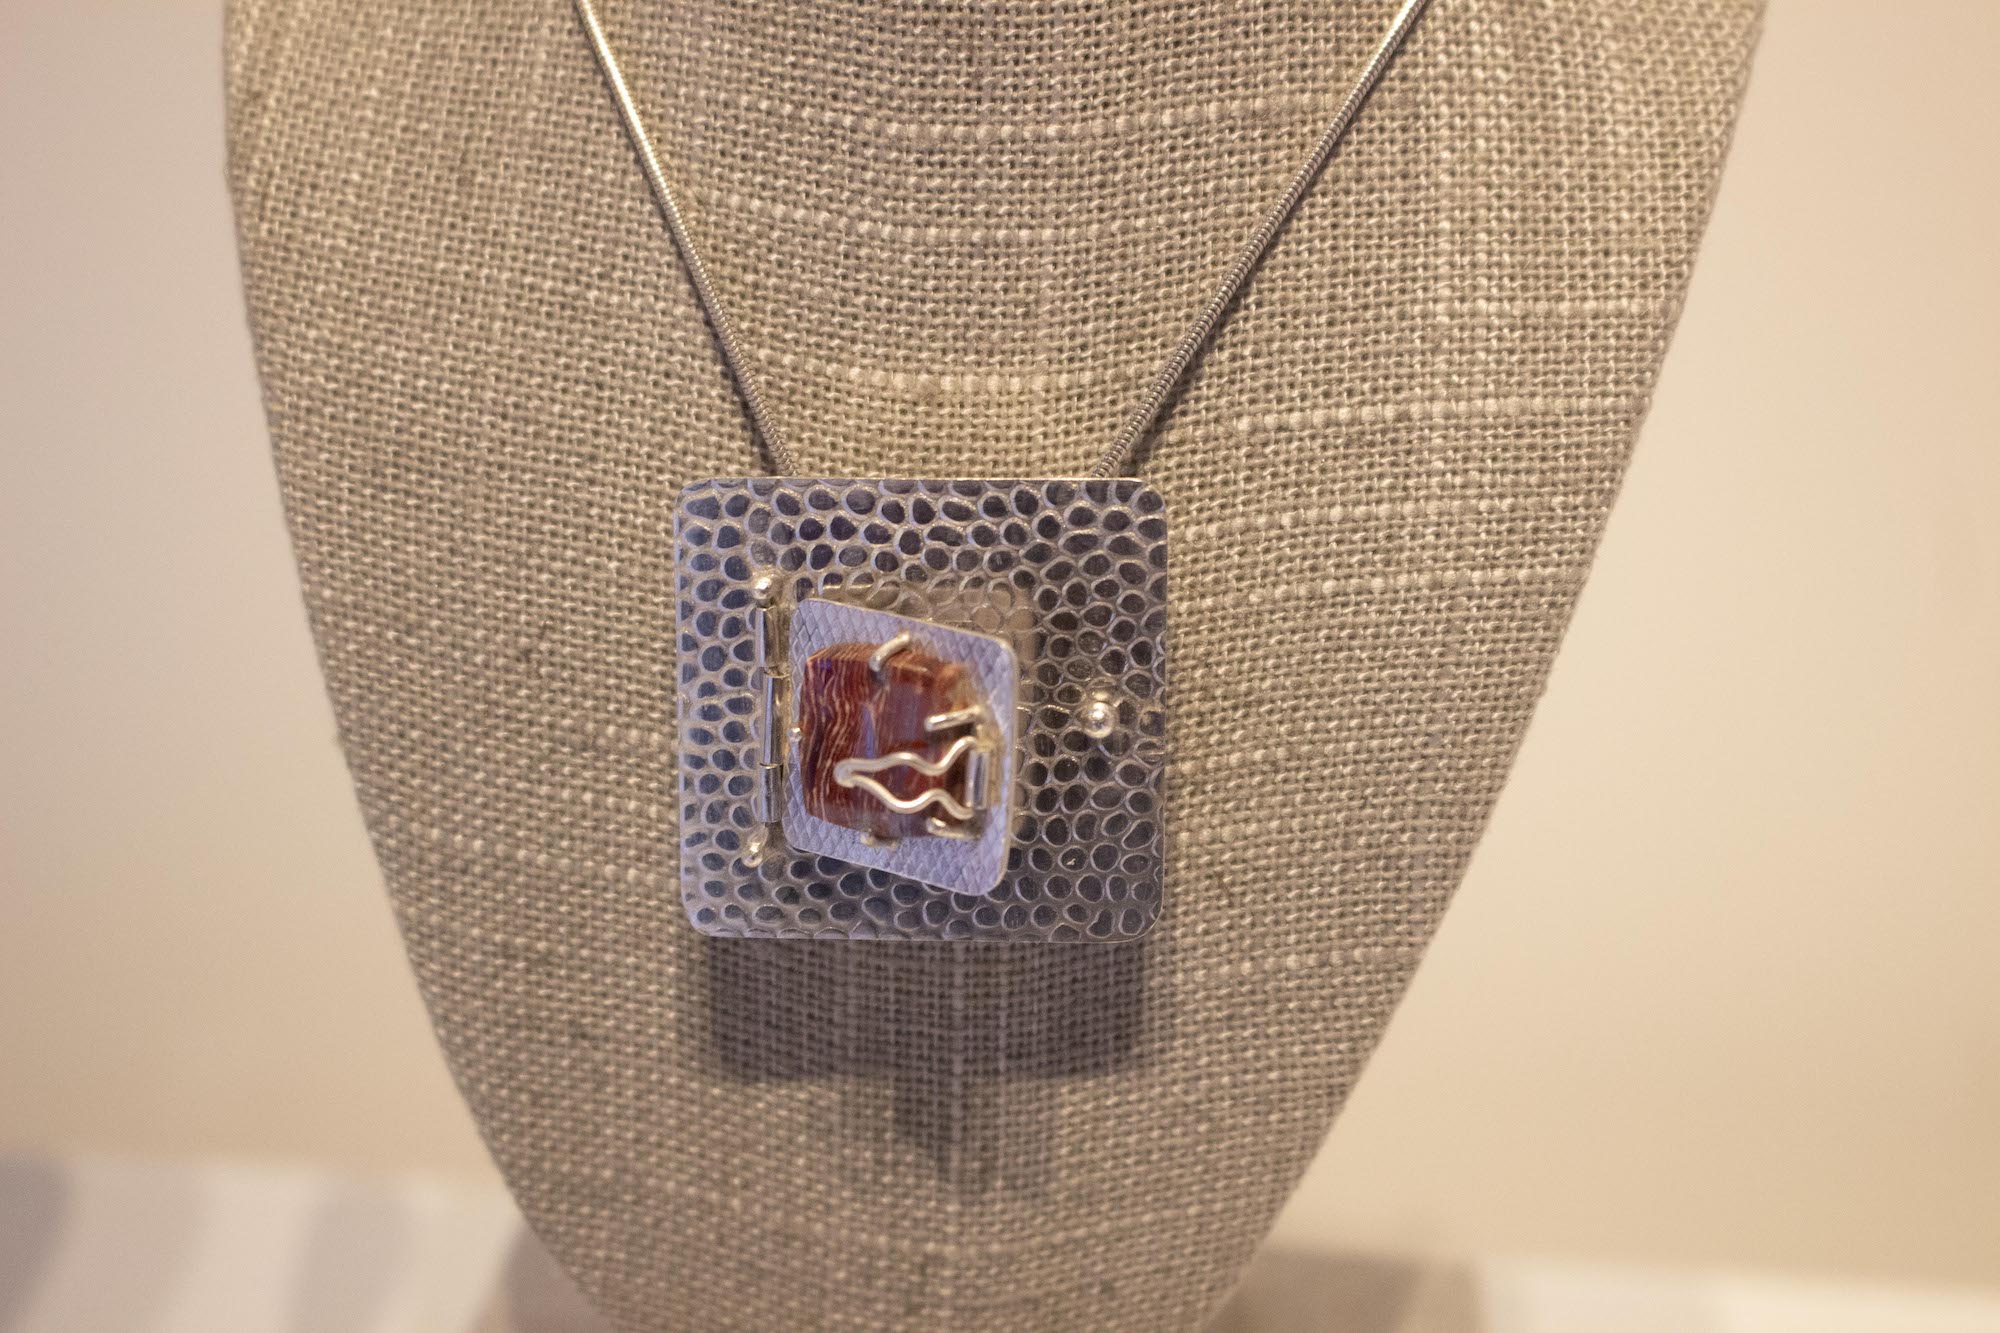
And, its secret treasure, behind the hinged door: a tube set bright red Madeira Citrine
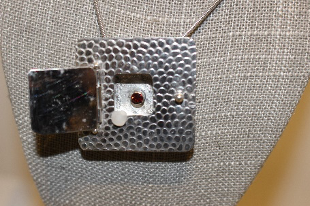
How did I get there? From raw material to finished piece involved many separate fabrication steps for three separate pieces: the front piece with the cut-out for the door and the prong set Petrified Wood stone, the box attached behind the front piece so that the round Madeira faceted stone could be set in a recess, and the door itself with its hinge and clasp.
How does a jeweler go about making such a piece?
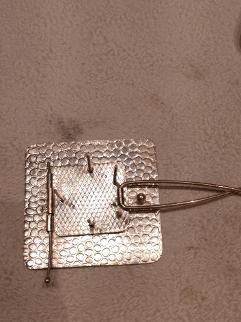
First, two small pieces of silver, are rolled through a rolling mill so that patterned brass embosses the two different patterns onto the silver – round tiny river stones for the front piece and a diamond-checked overall pattern for the door. Imagine grandma’s old washing wringer in the basement – she put the wet clothes between two rollers, turned the handle and the rollers rotated and squeezed water out of the clothes. That’s the idea, except I used silver plain metal and patterned brass so that the rollers “squeezed” the pattern into the silver as they turned.
See those posts sticking up on the door in the picture? They’ll turn into prongs for the petrified wood stone after they’re cut to size, polished and bent over the stone. On the picture’s left, you’ll see three tiny misaligned pieces of tubing and a piece of wire sticking out of them. They will become the door hinge. The bottom and the top piece of tubing were already soldered to the silver base. The middle tube was soldered only to the door. For the clasp, a tiny piece of tubing was soldered to the right side of the door, and a tiny ball of silver soldered to the silver front piece.
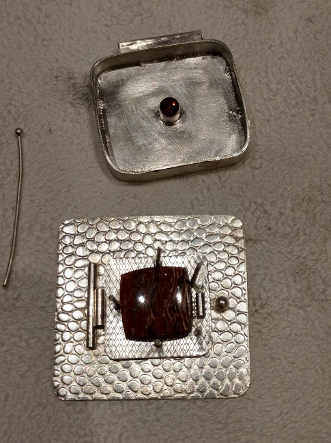
Hold that thought. Now the soldering is done on the silver base and on the door, so you put that aside. Next you fabricate the box that will be eventually soldered behind the silver base. When that’s done, you’ll solder the open tube onto the box bottom; later, you’ll set the 4mm Madeira citrine in this tube. Here’s how those two separate pieces look, with the stones resting in place but not yet permanently set and the hinges not yet completed:
It’s always a dance to figure out what you solder first, next, and last. When you have to heat the piece a great deal with a torch, such as when soldering the box fully to the back of the front piece, you don’t want to concurrently melt your previously soldered smaller pieces. However, if, for example, you don’t solder the tube setting inside the box BEFORE you solder the box to the top piece, you won’t be able to solder it down through the cut out in the top piece without it sliding around. As much as you can, you pre-finish and polish what you’ve just soldered as you go.
So, next, you solder the box to the back of the silver top with the door cut out, making sure that your tube setting for the faceted stone will show through the door cutout. I chose to attach connectors to the box and easy soldered those onto the top piece so that I wouldn’t disturb the tubes already hard soldered to the top piece. Lots of tricks of the trade to accomplish that!
Next you straighten the tubing out, align all three pieces from the front piece and the door, and insert the wire fully. Then you cut the wire so it sticks out a tiny bit beyond the top tube, then VERY carefully use a torch to heat that tip of wire into a ball WITHOUT melting your door, hinges, or front piece. The door now swings open and shut.
Since you only want the door to swing when you decide to open it, a clasp is fabricated to hold it shut and open it. The tiny piece of tubing was soldered to the right side of the door, and now the silver wire threaded through that tube and bent so that it will click onto the ball of silver soldered to its right on the silver base.
Now you set the Petrified Wood stone on the top of the door by trimming and finishing the prongs. The Madeira Citrine would have been heat damaged if you set it before finishing all the soldering. So, now, very carefully, you hold the piece securely in a setting vice, and reach through the cut-out for the door and set the Madeira Citrine into the tube setting.
After the final polishing, here’s my Hidden Treasure, “What’s Behind Door #1?”
The exhibition is from January 17 through March 27, 2020 at the League of NH Craftsmen Headquarters in Concord, NH. Details below:
https://www.nhcrafts.org/event/48053/
Visit Marcie’s Artisan page to see more of her work.
